
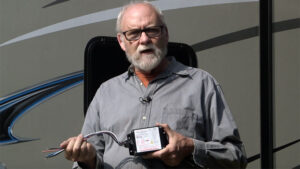
Jeff Johnston here for “RVing Today TV.” Adding stability to a travel trailer is always a good thing. The less of that sway that you have while you’re towing, the more comfortable and the safer you are in the tow. Well, you can do that by making the correct adjustment between your hitch, your tire pressures, the loading in a trailer, and so on. But even when it’s dialed in just like you think it should be, sometimes it’s not quite right. In a case like that, you can enhance the stability with a device like this, the Tuson Sway Control. This is an electronic device, fastens to your trailer, doesn’t have any modifications on the tow vehicle, and this device is designed to automatically help bring the trailer back in line behind your vehicle in the event that you begin to have a sway situation, and it does that by rewiring the trailer brakes in a way that we’ll show you in a little bit here. Now, we’re going to go ahead and do the installation ourselves to show you that, yes, an owner can do this at home. If you feel at all uncomfortable with the idea of tapping into your brake lines or your wiring for the brakes, then don’t do it. Take it down to a shop, a certified dealer that can install it for you, ’cause it’s really not. that big of a deal. But if you’re comfortable with wiring and this is the sort of thing that really excites you and you kind of enjoy doing yourself, well, give it a shot. We’re going to go through the process and show you what it takes.
 The instructions call for the Tuson to be mounted with between 1 and 10 feet back from the hitch ball. Well, this trailer has an underbelly. So, rather than dig into the underbelly and have to mess with that, we’re going to go ahead and mount it right here in the front– on the front, the first crossmember behind the hitch, and this puts it about 3 1/2 or 4 feet back from the ball, which is going to be plenty of room because what it needs to be able to do to sense the sway is when the trailer pivots on the hitch ball, the Tucson has to be able to move back and forth in order for the inertial sensors to be able to activate and apply the brakes and do what they’re doing to deter the sway. This ought to work fine. This also gives us ready access to the junction box for the trailer brake wires and so on. It ought to be a pretty straightforward installation.
First, we remove the batteries and battery trays, plus the propane cylinder cover to open up as much access as possible to the wiring areas. The Tucson installs in the center of the frame side to side. So, we’ll measure here. That’s 43. We got 21 1/2 right there. Okay, we have our location marked. So, we’ll be drilling a couple of holes per the instruction to mount that right about here. All right.
The sway control label includes a detailed wiring diagram that helps when you’re deep into the project. The owner’s manual, likewise, covers all of the details in easy-to-understand diagrams throughout. We’re fairly lucky we have pretty easy access to the brake control wiring and so on. It’s right here inside the frame, and the junction box is just up ahead here. So, we find everything pretty easy to trace. So, it’s a matter of following the wiring diagram on the case for the Tuson and, of course, the wiring diagram for your standard trailer wiring. It looks complicated, but work methodically, one wire at a time, and it all falls into place.
We have the sway control mounted here in the middle of the frame. The wires are tapped into the brake wiring and trailer wiring bundle over here. So, we’re going to secure all these with zip ties and so on, bundle them up, make sure they don’t rattle around while we’re driving down the road. And from here we move back to the wheels and take care of the brake separation back there.
This is the indicator light that you mount on the far side of the trailer someplace so the driver can look in the rearview mirror. And if the trailer begins its anti-sway activity, the LED lights up so the driver can kind of get an idea something’s happening back here. The actual brake wires have junctions back here behind the left-side wheels. So, in order to get a better access to that, we’re going to jack the axles up, prop everything up according to industry specs, take the wheels off, and be able to reach. the wiring we need to work on.
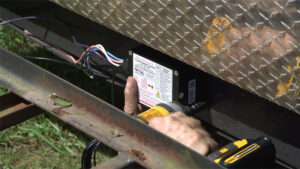 Well, we have the brake control mounted up on the front of the trailer. That’s ready to go and wired. Now what we’ve divide– done is divided the left-side brakes and the right-side brakes into two circuits, and we re– the left-side brakes is still connected to the original cabling. The new wire here is to connect to the right-side brakes so the brake controller– the Tucson Sway Control can control. them independently, which is what helps to bring the trailer back in line during a sway condition.
Don’t be shy about testing and tracing any wires that aren’t clearly labeled or color-coded. We finished the installation. It only took us around 7, 7 1/2 hours, including pauses to shoot video, of course. So, all that’s left now, go out, hit the road, and see how it works. Based on our last experience with a Tucson Sway Control, we are positively optimistic.
A final test is heading down the road and checking out the trailer’s handling in traffic conditions. We had no strong winds. to deal with, but lane changes and passing traffic produced no unwanted sway effects. A later freeway test produced the same results, with easily-controlled towing and minimal sway reactions. The Tuson Sway Control does what it’s advertised to do. For more information about the Tuson Sway Control, log on to our website at RVingtoday.tv