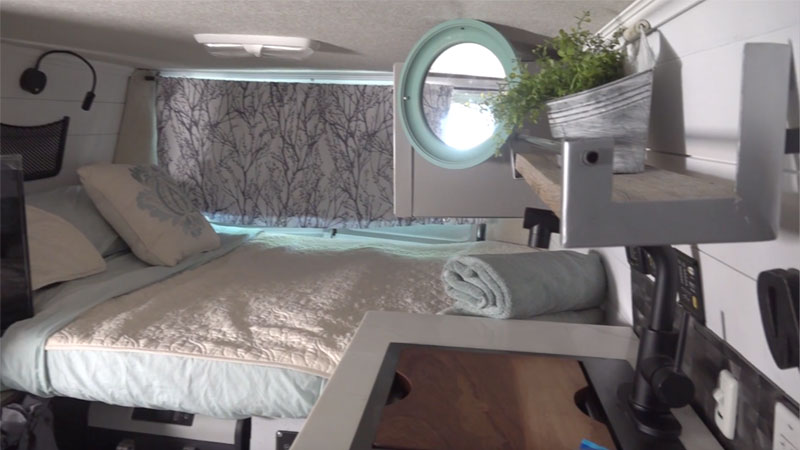
 Dawn Polk: I am excited to reveal the interior and exterior of our completed van conversion project. We’ll start on the inside. When you open the side door, you see the finished floor, and Mark added an LED light at the step to help when it’s dark outside. There is a switch here, or you can turn it on using a small remote. Then you see the fold-down table that covers the area below the sink, and it gives me counter space when I need it, or I can use it as a table to work at. Next, we have the beautiful quartz countertop with a great sink and faucet setup. You’ll also notice that the small farmhouse shelf Mark made–then you’ll see our “adventure” sign, which we cannot wait for all the new adventures in the van. And the backsplash above the countertop– we have our small microwave and coffee pot. All of this is on the industrial style cabinet frame. We have our industrial storage locker mounted on the wall and our full-size bed at the back. You have access under the bed to get to all the stuff Mark will talk about in a minute. On the opposite side, there is the industrial style TV cabinet with a farmhouse wood top. We have our 28-inch, 12-volt, 120-volt TV from RecPro on a mount that conveniently swivels to view from anywhere in the van.
 The cabinet also houses our Dometic portable toilet for those occasions a bathroom is not available. You can also access it from the outside when it needs to be emptied at the dump station. Up front, we have our new used seats from a Sprinter van. They move forward and backward, and they swivel, and they recline. In between the seats, we have our removable farmhouse style table. We added new carpet, and we got the center console cover from a Class C motor home at the junkyard. Mark repaired and painted the old steering wheel and upgraded the dash and all the controls to a modern-day vehicle. There is a backup camera, functional oil amp and temperature gauges, a USB charger, and 12-volt power outlets. He installed switches for the backup camera, the dash fans, and the radio when we are camping, and there’s a digital battery voltage gauge light right here. That is a preview of our van camper interior. Now let’s look at the exterior of the van, and then the heartbeat of our off-grade conversion project.
♪♪♪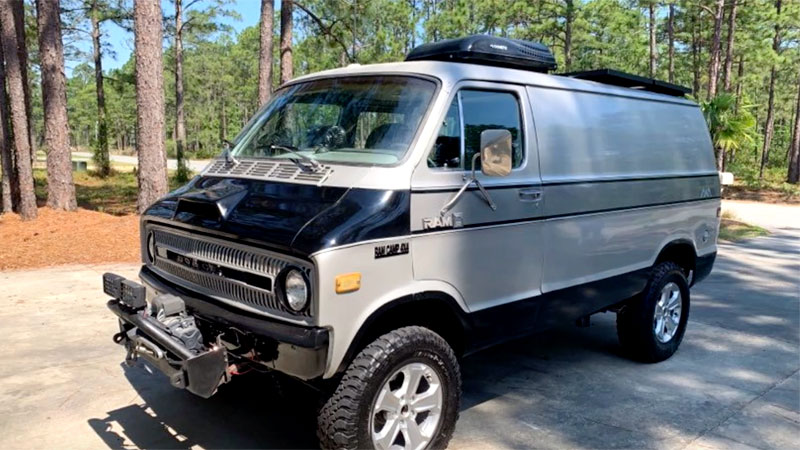 Mark Polk: The first thing you notice on the exterior is the paint job. My goal with the paint was a clean and classic finish. We used boulder gray paint with black highlights and a slightly darker gray middle stripe. I also added some painted-on pinstripes to separate the colors.
Then we added our “Ram Camp” logos at the rear of the vans and our “Ram Camp 4X4” emblems. I painted the entire hood in old school functional hood scoop black. And here’s our old school grill with “Dodge” highlighted in black in the center. To finish the front, we have our bull bar, our 12-volt wench; and at the rear of the van, we have our functional cargo tray with a generator, a fuel can, and a water can. Below the tray is our high lift jack to help get us out of any jams. Now we can look at the heartbeat of the “Ram Camp.”
♪♪♪
Mark: We had lots of help on this build. And in no order, I’d like to thank Dometic, “Go Power!” by Dometic, RecPro, WIPCO, and Steele Rubber Products. This build started with our two 190-watt solar panels, a charge controller, a 250-amp lithium battery, and a 2,000-watt inverter, all by “Go Power!” We added a WIPCO power center with auto detect technology and a second 2,000-watt inverter. We also have a small generator as a backup electrical system. We have our powered cooler, Penguin air conditioner with heat strip, portable toilet, and portable lithium battery all by Dometic. For the water system, we installed a RecPro fresh water tank, a 12-volt water pump, gray water holding tank, and an outside shower. We also installed a 12-volt water heater. And to help support the weight over the rear axle, I installed 5,000-pound rear airbags.
From start to finish, this 4X4 van conversion project took 5 months. There was a lot done to the van that didn’t make it into these six episodes. First and foremost, I wanted the van to be safe for travel. When you start with a 40-something-year-old vehicle, there’s a lot of mechanical work that needs to be done. Then we got to the fun stuff: making a functional off-grid vehicle that looks good, too. It was a fun project, and now we get to use and enjoy our weekend getaway vehicle.
♪♪♪
Dawn: Thank you so much for following us on this adventure. And if you want to learn more about using and maintaining your RV, visit our popular RVonlinetraining.com site.