Let’s start our spring RV preparation by de-winterizing the RV plumbing system. Depending on how your unit was winterized it will need to be de-winterized, but make sure the freezing temperatures are over for the season before you do.
 Basically what needs to be done is to flush all of the non-toxic RV antifreeze out of the RV plumbing system. Chances are, on average you used 2 to 3 gallons of RV antifreeze to winterize the unit. The easiest method is to flush the RV antifreeze out by running fresh water through the water system, either through the city water inlet or the fresh water holding tank, using the water pump. Open all of the faucets (hot and cold) and run fresh water through the system until it flows clear. All remnants of the antifreeze will go into the holding tanks and can be emptied at a dump station later.
If for any reason you added RV antifreeze to the fresh water holding tank it will need to be drained before adding any potable water to the fresh water tank.
Note: You will need to decide the best method for draining and disposing of the RV antifreeze. Most RV antifreeze is biodegradable and safe to the environment, but you should check before disposing of it. Much of it can be drained into a large bucket and then disposed of properly.
Another method, if the RV antifreeze you used is biodegradable, is to open drains and drain the non-toxic RV antifreeze from the system into a container. If you do not have a bypass kit on the water heater you need to drain the antifreeze from the water heater too, but keep in mind it will be 6 or 10 gallons depending on the size of water heater tank.
After draining the antifreeze close all of the drains.
Re-connect the outside shower hose if it was removed.
To remove antifreeze from the 12-volt water pump add potable water to the fresh water holding tank, turn the pump on and open all water faucets. Run water through the system until clear and then turn the pump off.
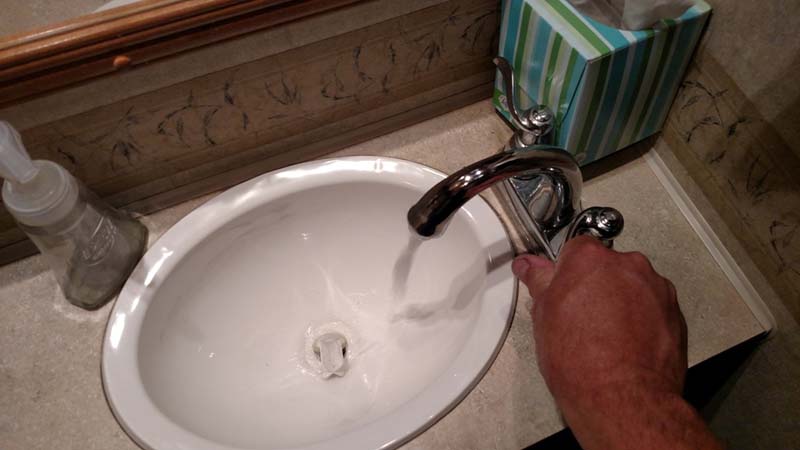
Take the water heater out of the bypass mode and hook your drinking water hose up to the city water inlet. Turn the water on and open all water faucets (hot & cold). Run fresh water through the system for several minutes. Don’t forget the outside shower if equipped. It will take a couple of minutes to fill the water heater tank before water will come out of the hot water faucets.
Fill and flush the toilet. Add some additional water to the black water holding tank and treat it with holding tank chemicals so it is ready for use.
Re-install any water filter cartridges you removed prior to winterizing. With pressure on the system check the entire water system for leaks. The RV is de-winterized.
 At this stage of the RV spring preparation process I like to sanitize the water system. It’s not difficult to do, just follow these simple steps.
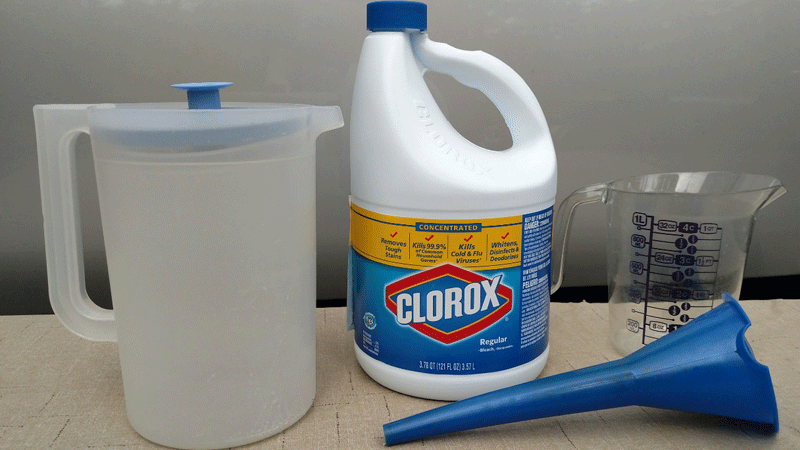
Take a quarter cup of regular household bleach for every fifteen gallons of water that your fresh water tank holds. Mix the bleach, with water, into a one-gallon container and pour it into the fresh water holding tank.
Fill the fresh water tank completely full of potable water.
Turn the water pump on, open all hot and cold faucets, and run the water until you smell the bleach at each faucet.
Close the faucets and let it sit for at least twelve hours.
Drain the entire system and re-fill the fresh water tank with potable water.
Open all of the faucets and run the water until you no longer smell any bleach. Once this is done it is safe to use your water system.
Tip: It’s also a good idea to use a water filter at campgrounds and keep bottled water on hand for drinking.
Watch Sanitize the RV Water System Video
Subscribe to our YouTube channel To learn everything you ever wanted to know about your RV check out Mark’s best-selling book, The RV Book
Happy Camping,
Mark J. Polk
RV Education 101
Follow us on Facebook