Mark Polk: Hi, I’m Mark Polk with “RV Education 101.” Today, we’re gonna talk about slide-outs and, more specifically, the slide-out seal. The slide-out weatherstrip seal is one of the most important seals on your RV. Its job is to completely seal this massive opening in the RV and prevent water and other unwanted debris from causing costly damage to the interior of the RV. Eventually, this seal wears out or gets damaged and needs to be replaced.
 Our Destination camper is an older RV and the slide-out seal was worn out, so we’re gonna replace the seal. Tools we need: an assortment of plastic scrapers, a good cleaner, adhesive remover, scissors, adhesive, and gloves. There are lots of slide-out manufacturers and slide-out seals. Whenever I need a new weatherstrip seal, whether it’s for a classic car. I’m restoring or the RV.
I go to Steele Rubber for the replacement seal. Their website is easy to navigate and if you cannot find the correct seal, you can call customer service and they will assist you. When you order the seal, make sure your measurements are accurate so you don’t come up short. We have our replacement weatherstrip seal from Steele Rubber so the first step is to remove the old seal. The existing seal on your slide-out might be affixed adhesive or it could be a push-on type seal
with no adhesive. If it is affixed using an adhesive, like this one, you can use a plastic scraper to assist in removing the old adhesive. Remove as much of the adhesive as you can. Make sure any products you use do not damage or remove the paint. Clean the surface thoroughly using a good cleaner. It is not necessary to remove all the adhesive from the surface. If replacing the seal involves steps like removing a slide-out topper, you may want to let the professionals handle it.
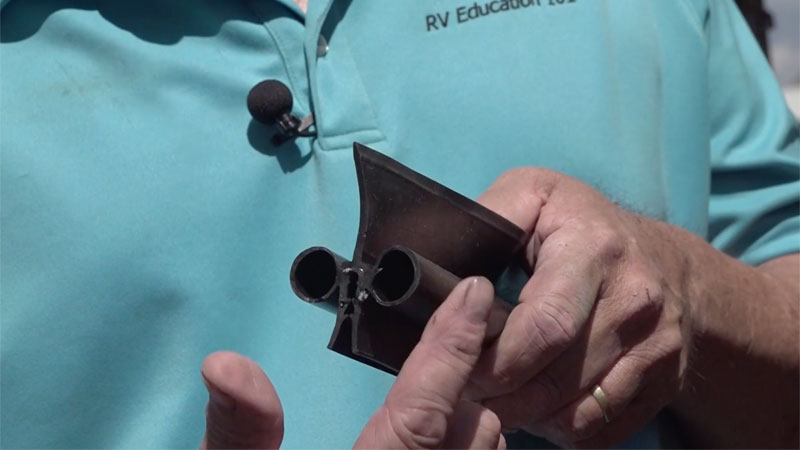 Our replacement seal is a push-on seal manufactured of high quality EPDM rubber and if you look right here you can see it is encased with a flexible metal core base to ensure weather resistance and durability. It has two bulbs, one on each side, and a wiper to provide a complete seal when the slide-out is closed.
Mark: With the old seal removed, it’s time to install our new seal. To install the seal, we are going to push it on this pinch weld all the way around the slide-out. The pinch weld has a raised edge and our seal is designed to lock on that edge when it’s pushed in. It’s a tight fit and the key is to push the new seal all the way into the metal core base. A good plastic tool is helpful to push the seal on, but do not damage the seal. You do not need to use an adhesive with the push-on seal but it can be used as an added measure of securing the seal to the slide-out. If you use an adhesive, make sure it is intended for use with rubber products. We’re using Loctite Super Glue.
Mark: The corners and the top of the seal are extremely important to the installation because this is where the brunt of the rain hits the seal, especially without a slide topper on the RV. When you go around the corner, you can see the wiper section of the seal does not cooperate very well. That’s because we need to cut the wiper to fit properly around the corner. Carefully cut the wiper so the top section overlaps the vertical section of the wiper. Next, we need to make that overlap work together as one piece. Apply a small amount of adhesive and secure the top piece to the vertical piece. Repeat this on the opposite side of the slide-out.
I recommend inspecting all the seals on your RV a couple of times a year. When you discover a worn-out or bad seal, order the replacement seal and install it on the RV. If you’re not comfortable replacing the seal yourself, take it to your local dealer and have the work done there. These small rubber seals do a big job protecting our RV from costly damage.
Happy camping from Mark Polk of RV Education 101