Every now and then, a product comes along that’s not only functional but has many practical uses, and it just makes sense to get one. That product for me is the original TailGater Tire Table. Let’s take a closer look.
 The concept behind the invention is to use a tire as the main support for the table. Now the table is stable regardless of the ground condition where you are using the table. The tailgating table is collapsible, portable, compact, and strong, and is a great addition to your tailgating gear and camping essentials. It can be used on virtually anything with a tire: RVs, toy haulers, horse trailers, or your vehicle. If it has a tire, you have a stable table. Also, any exposed spare tire if your vehicle has one. When the table is on the rear spare tire, you can still have easy access to the back of the vehicle. These features make it the perfect table to take with you on camping trips, road trips, a fun day at the beach, or your favorite fishing hole. I even use it for a workspace when I am doing odd jobs or maintenance on my vehicles and around the house.
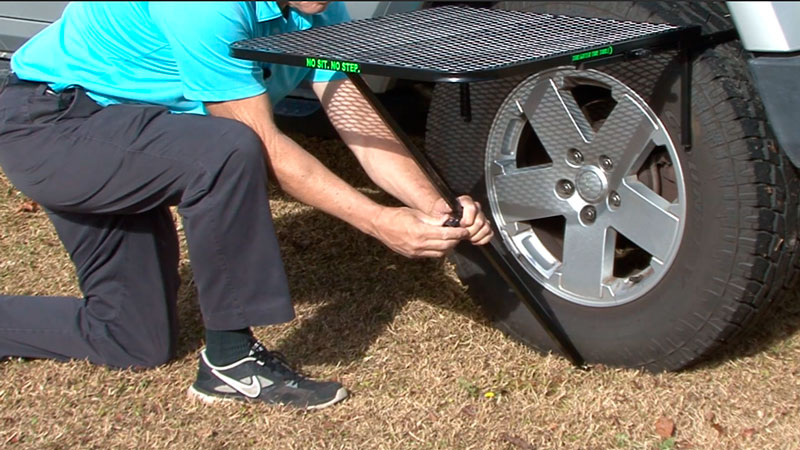 Now let’s take a look at how easy the TailGater Tire Table is to set up. Install three jamb bolts. There are two on the sides that will lock the rear tire support slider in place. The additional one is for the retractable leg, located in the channel down the center of the table. Press the silver push buttons to release each of the two small legs from the storage located on the bottom side of the table. Insert legs into the square receivers on the left and right sides next to the rear tire support slider with the bend in it. The legs will be pointed towards the bottom of the table and the grip tape will be pointed away from the tabletop, towards the tire. After installing both legs into their receivers, loosen the jam bolts on the left and right side and pull the rear tire support slider out about 12 inches. Put rear tire support over the tire and down until the slider rests on the tire. With one hand on the rear tire support and your thigh on the outside of the table, pull the table snug against the tire and tighten one jamb bolt. Repeat the same process for the other side. Leveling from the front of the table to the back can be accomplished by either raising the table and tightening it against the tire or loosening it on the tire, allowing it to be lowered at one end. Side to side leveling is accomplished by rotating the table on the tire. For added strength and stability, release the center retractable support leg by depressing the silver button. Angle the retractable leg towards the tire and rest it between the tire and the ground, which will help to avoid kicking or tripping on it. It can also be put straight up and down. Tighten the jam bolt when the leg is in the desired length. If your tires are 35-inch and up, flipping over the rear tire support slider so the bend is down will allow for more grip on the tire.
TailGater Tire Table is not a step or a seat. Using the table as either could result in injury and damage the table. Remove the table before driving.
Happy camping from Mark Polk of RV Education 101