Welcome back to the RV interior makeover finale. So far, we installed MCD day-night roller shades, whitewashed wood planks, Infinity luxury woven vinyl flooring. And today in the finale, we’re installing new RecPro furniture.
Our fifth wheel at the beach is getting older, and that basically meant older, worn out furniture too. So, to fix that problem and finish our RV interior makeover, we are installing new RecPro furniture in the RV.
When it came time to select new furniture for the RV, we went to RecPro. In addition to the many other products they offer, RecPro has a vast amount of RV furniture to choose from. They have every type, style, color, and finish to update your RV and make it look new again.
 We selected furniture from the Charles collection. We ordered the furniture, and in no time it was delivered. We’re starting today’s installation with the triple RV wall hugger recliner sofa with a dropdown console. One thing I really like is how the furniture is packaged. Each modular section fits easily through the RV door. And once it’s inside, it’s easy to assemble. You just align the backrest sleeves above the backrest posts that are attached to the seat frame. When you press the backrest down, you will hear it lock into place. Because this is our destination camper at the beach, we never move the RV, so we’re going to assemble the furniture, but we’re not going to secure it to the floor. If you’re like most people and you travel with your RV, then you’re going to want to secure it. And right here would be a good place to do it. To connect the furniture pieces together, you align the male floor rail pegs above the female bracket opening of the other furniture piece, then push down and slide back until it’s locked into place.
Now, we can tackle installing the new RecPro RV dinette booth and table. This dinette booth not only looks good, but it’s practical. There’s an entire seat’s worth of storage under the booth, and it serves as a spare bed too. And it’s super easy to install. Just locate the booth where you want it, attach the back section using the bolts provided, and attach the back cushion Velcro to the back section. My recommendation to secure the dinette booth seats to the floor would be to use some 1x2s around the inside perimeter, attach those to the floor, and then attach to the dinette booth, that way it’s not going anywhere.
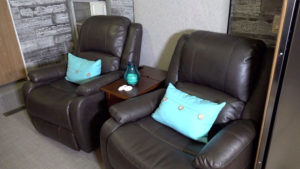
To complete the RecPro furniture transformation, we are adding one RV wall hugger recliner and one RV recliner swivel glider rocker. Not only do they blend into the rest of the decor, they are also functional and space efficient. When the wall hugger chair is fully reclined, it only needs three inches of clearance from the wall.
And to complete the interior decor, we included this RecPro RV side table with the recessed dual USB charging station and twin hidden power outlets.
It doesn’t matter what level of upgrading you are doing to your RV, RecPro will have what you are looking for or what you need to complete the project. For more information on this furniture and much more, visit recpro.com.
Happy camping.
If you want to learn more about using and maintaining your RV, visit rveducation101.com.