Chris Dougherty here. One of the things RV-ers and truck owners in general have to contend with if you have a three-quarter or one-ton truck is getting up into the bed. And if you’ve got the fifth wheel hitch back here, you may have to get up there to make some adjustments or install it, take it out, as well as your other gear that’s inside the truck. But it’s pretty high here and you can put some auxiliary steps on that’ll let you fold, the step out and step up onto it, but you’re trying to grab onto the side of the truck, it can be a little bit of a challenge. To fix that, we’ve got a product here called the Stake Hand.
What the Stake Hand does, we’re gonna install this in the stake pocket of the bed and it will go in most trucks that have a rectangular stake pocket on the side. And this is gonna allow us to put this handle in real quick and use it as a grab hold to go up. And this can also be a cargo tiedown and also has a flagpole that comes with it. So let’s take a look at the install of the Stake Hand real quick. So on our Stake Hand kit, we have a number of different parts that we’re gonna use to install it. So the first is gonna be our actual receiver that’s going to go into the stake pocket in the truck. We’ve got our handle. We’ve got the brackets which we’re gonna use for the mount that goes into the truck. They do include a cargo tiedown that you can use here.
To stow our handle inside the bed when we’re not using it, there’s two brackets to install there. We’ve got some thread locker and then we have our instructions which are very clear and show you how to do everything, including scanning for an install video right here. So the first thing we’re gonna do here in the stake pocket and this is a 2019 F-350. We’re gonna go ahead and pop the plastic cover that’s part of the rail cover off, and you see your stake pocket inside there. They give you two different capture plates to use with the kit, depending on the size of your stake pocket, and it gives you directions on which one to pick. And for this F-350 we’re gonna pick the larger size. We’re gonna put this through the hole and then start the assembly with just one screw. When you’re gonna put this in, you feel inside your stake pocket and you’re gonna see that back in here behind the bed rail is a little bit more space. So what we’re gonna do is with the one screw on here, we’re gonna take this in and we’re going to finagle the bracket in so that it’s gonna sit down behind in that deeper area and then we can push the whole thing through. It takes a little bit of finesse here, but you can kind of get it in there and it’s about like so, so you can see here how the capture plate is going to work. Now that we’ve got the capture plate in, we’re gonna start our other screws, but again, we’re not tightening them down yet because we want to put some thread locker around here. I’m gonna get them lined up and get them started here a little bit. Now, we have all four screws started and the next thing we’re gonna do is gonna get our thread locker and we’re gonna coat the screws with the thread locker. This kit is primarily no drill. We’ll have a couple of brackets to put in to hold the handle. But what we’re gonna do here is put some thread locker blue on these screws in here. And all we’re doing is just getting some on the threads of each one. Okay, there you go. Your mount is in place and the installation of the Stake Hand itself is all done.
Now, we’re gonna put a bracket in the bed that’s gonna hold our Stake Hand while it’s not in use. We’re gonna install the handle mount in here to hold the handle while it’s out of the way. And so we’ve spoken to the owner of this truck. We’re gonna put the brackets here and here and that will allow us to snap them in place. But you can put this wherever it’s handy for you in the back of your truck. So if there’s a spot here or here, whatever is convenient for you to put them, you have the option of doing that. So what we’re going to do is take our spring brackets and we’re gonna start with the install right about where we want it. Okay, we’ve got our Stake Hand all set. So it doesn’t matter whether you’re five foot six, or six foot five, getting into the back of a one-ton truck like this, just having to hold on to this can be a real problem. So just being able to reach in here, grab our Stake Hand and then all we do is step up onto our step and get right into the back of the truck and it’s nice and easy. So another option that you can have for your Stake Hand is this flagpole kit, so you can show your colors anytime you want to.
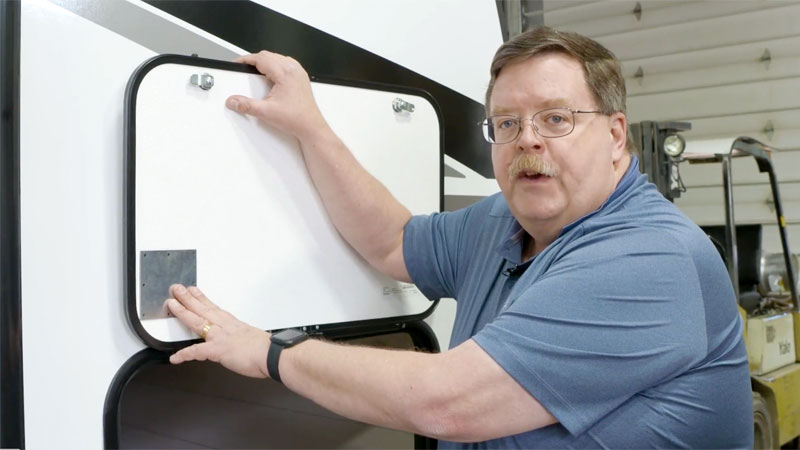 Chris Dougherty here. If you have a higher end RV, you might have gas props that hold this up. But did you know that you can get a kit that makes it real easy to put these kind of props on these doors? Let’s take a look. So here is a good DIY kit for putting gas props on your compartment doors. This is a kit from Hatchlift and there’s different sizes for different doors, so get a measurement before you put your kit on. But it’s really a pretty, straightforward installation. The kit comes with everything that you should need to install the gas prop. The key to this is this plate right here. So, not all compartment doors are made the same. Some are thicker or thinner than others. Some have more structure than other ones do. And so the key to this plate right here is this 3M VHB tape that’s on the back. And so when we prep the door and put this on there, this is going to give the door enough support so that it can work well with the gas prop. This also comes with the other brackets that you’ll need. For the 3M VHB tape, we have an adhesive promoter here and a Scotch-Brite pad we’ll use for that and some alcohol wipes, all the hardware you might need, some wood blocks for support if you need that for the inside of the compartment. There’s your other bracket and a strap to pull down the door when you’re all done. We’ve already started our installation here. We’ve prepped it. We did the measurements and outlined where the vacuum plate is going to go on the compartment door. And to my point, you know, you look at some of these doors, some of them just have a little bit more flex in them than others do. And that’s why we’re gonna use this backer plate to make sure that we’re in good shape. Go ahead and scour this. So what we’re doing here is: scouring this with the Scotch-Brite pad. So this backer here is fiberglass reinforced, plastic paneling. So we wanna make sure we have a nice, rough surface here. And then when we’re done with that, we’re gonna take an alcohol prep pad. They include a couple in the kit, and we’re gonna clean the area up here. So we’ll go back over it again and then we’ll let that dry. This is a 3M primer 94 adhesive promoter. So, what we’re going to do with this is it has a little dot on it. So we’ve crushed it there with the dot, and now we’re going to go over this entire area with the adhesive promoter.
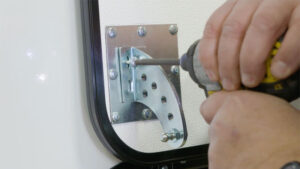 Now, we’re gonna take our plate and we’ve got our 3M VHB tape on the back here. We’re gonna go ahead and peel the backer off of that, and then we’re gonna carefully mount this to the door, lining up with our lines that we’ve already done, and we’ll just press it on there. The 3M VHB tape takes about 48 hours to fully cure. So once we’ve finished our entire installation, we’re gonna take the gas prop back off and leave it off for 48 hours so that this can get its full strength and then we can put the gas prop back on and we’ll be good to go. Okay, so the next thing we’re gonna do is put our screws in the plate into the door, but here’s the key to it: is that it’s pretty easy to strip the holes out on the door. So we’re gonna start them with our screw gun. Then we’ll switch over to a hand screwdriver just to carefully tighten them down. So now, we’re just gonna carefully torque these down by hand and just get them flat. You don’t wanna over-tighten them. Again, the VHB tape is doing the majority of the heavy lifting here. Now that we’ve got the door hardware stuck on it, I’ve installed the bracket on the door, the next thing we’re gonna do is install our gas prop and then we’re gonna measure where we’re gonna have it on the door jam. Okay, here’s our other bracket, like so. So now what we wanna do is we can pre-measure this so that it fits just right, and I’ve done so already. So what I can do now is go ahead and put our screws in.
This RV here has a really nice structure behind the door jamb, and so this gives us plenty of strength to screw it to that. But if you need to get behind it with a block of wood or use a different bracket, those pieces are included with the kit. Okay, we have our kit installed and we have our handle, strap handle, on here with our Velcro. And so this is good, if you have a particularly tall door, to pull it down. This is also good for people who may be physically challenged and it might be hard for them to go up and reach the door, and you can just put the Velcro back on there and then you can close the door and as you’ll see, closes itself down nicely and you just lock it off. When you go to open the door, twist the lock, pull the door open and it goes right up and out of the way. Okay, and if you have a queen bed in your RV or a king size bed that doesn’t have gas props on it to access the storage underneath, Hatchlift also makes a kit that will take care of that for you. It’s called the bed lift kit. There’s different sizes, depending on the size of the bed that you have and the weight of the bed that you have, so you can install that and then you don’t have to worry about the bed coming down on your head while you’re trying to get stuff out from underneath.
For more information on Hatchlift products, visit their website at ‘Hatchlift.com.
Learn more about Chris Dougherty of Dougherty RV Consulting and the RV PhD here.